


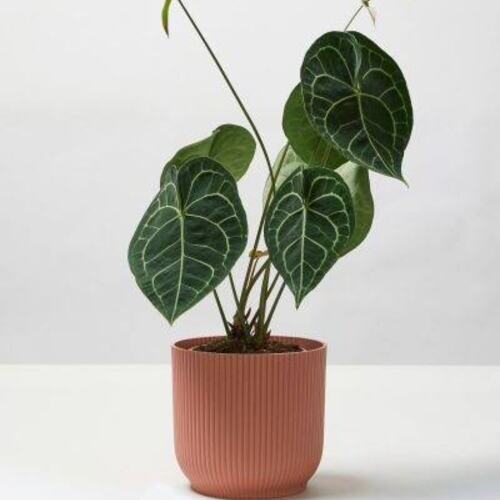
Anthurium clarinervium is one of the most magnificent and botanically extraordinary foliage plants available to indoor plant enthusiasts, celebrated for its extraordinarily large, velvety, deep forest-green leaves dramatically traced by a network of brilliant silvery-white veins that create a pattern as intricate and beautiful as the finest lacework — the inspiration for its evocative common name, Laceleaf Anthurium. Native to the limestone outcroppings, rocky ravines, and oak-dominated cloud forest understorey of the Chiapas highlands of southern Mexico — at elevations of approximately 1,000–2,500 metres — it grows as an epiphytic or lithophytic plant, anchoring its roots in the organic debris and moss that accumulates in rock crevices and tree bark crevices rather than in conventional mineral soil. This highly specialised native habitat defines virtually every aspect of its cultivation requirements: exceptionally well-draining, bark-rich, epiphytic growing medium; consistent but not excessive moisture; high ambient humidity; and bright indirect light without any exposure to direct sun.
The leaves of Anthurium clarinervium are the centrepiece of its extraordinary appeal. Emerging as small, compact, almost heart-shaped (cordate) blades, they expand over weeks into large, deeply cordate leaves measuring 12–18 inches (30–45 cm) or more in length on mature specimens. The leaf surface has a distinctive velvety, almost suede-like texture produced by papillate cells on the epidermis that trap and diffuse light, creating the deep, rich, matte appearance that distinguishes velvet-leaved aroids from their glossy counterparts. Against this deep velvety green background, the veins — particularly the primary midrib and the secondary lateral veins — stand out in brilliant silvery-white or pale cream, creating a high-contrast pattern of extraordinary elegance. New leaves emerge wrapped in a pale, papery cataphyll (a modified leaf that protects the developing new leaf as it unfurls) that is typically pale green to cream in colour and dries to a papery brown with maturity. The petioles are long, round, and subtly ridged, often flushed with a pale reddish-purple tone particularly on younger growth.
Anthurium clarinervium belongs to the section Cardiolonchium of the vast Anthurium genus, which comprises over 1,000 species distributed across tropical America from Mexico to northern Argentina. Within this section, it is part of a distinctive group of velvet-leaved, large-foliage aroids prized by collectors for their ornamental leaves rather than their flowers. In its native Chiapas highland habitat, the plant experiences distinct wet and dry seasons, cool night temperatures due to its montane elevation, and the consistent high humidity produced by cloud forest and mist. These conditions — cooler nights, bright but filtered light, high humidity, and an open, fast-draining epiphytic substrate — must be approximated in cultivation to achieve the most spectacular leaf development. When properly cared for, a mature Anthurium clarinervium is one of the most breathtakingly beautiful foliage plants that can be grown indoors, with each new leaf emerging as a unique work of natural artistry.
Caring for Anthurium clarinervium is an intermediate-level challenge that delivers extraordinary ornamental rewards when the plant’s specific environmental requirements are met. The foundations of successful cultivation rest on four interconnected pillars: an exceptionally open, bark-heavy, epiphytic potting medium that drains and aerates the roots as it would in nature; high ambient humidity consistently above 60%; consistent but carefully moderate moisture that keeps the roots moist without any waterlogging; and bright indirect light that supports vigorous leaf production without scorching the velvet surface. When all four are provided together, the plant grows with impressive regularity, producing a succession of ever-larger, increasingly spectacular leaves that deepen in colour and vein contrast as the plant matures.
The potting medium is the single most critical care element and the one most frequently mishandled. Anthurium clarinervium is a lithophyte and epiphyte in nature, growing in free-draining, highly aerated organic material with minimal true soil. Standard tropical houseplant mix is far too dense and moisture-retentive for this species and will cause root rot within weeks of normal watering. An ideal mix is heavily weighted toward orchid bark, perlite, and other chunky, fast-draining materials, with only a minor proportion of organic potting mix for moisture buffering and nutrient retention. The roots of this species are thick, fleshy, and white — typical of epiphytes — and require both moisture access and excellent oxygen availability at all times. Any mix that remains wet for more than 24–48 hours after watering is too moisture-retentive for this species.
Humidity management is the second most important and most frequently neglected care requirement. Anthurium clarinervium originates from cloud forest environments where ambient humidity is consistently 70–90%, and it suffers visibly in the 30–50% humidity typical of most indoor environments, particularly during winter heating season. Brown, crispy leaf margins — especially on the new, unfurling leaves — are the earliest and most characteristic symptom of humidity deficiency. A dedicated cool-mist humidifier maintaining 60–80% ambient humidity is strongly recommended for indoor cultivation and produces visibly superior results: larger leaves, richer vein colouration, and faster growth than plants grown in dry conditions. Terrarium and enclosed cabinet cultivation offers the most elegant solution to sustained high humidity in dry indoor climates. Regular monitoring of ambient humidity with a hygrometer and prompt supplementation when it drops below 60% is one of the most impactful care practices available to the indoor grower of this species.
 Soil
Soil
Anthurium clarinervium requires an exceptionally open, chunky, fast-draining, epiphytic potting medium that provides both moisture availability and outstanding root zone aeration simultaneously. The roots of this lithophytic/epiphytic species are thick, fleshy, and physiologically adapted to growing in the highly aerated conditions of rock crevices and bark surfaces — they require both consistent moisture access and continuous oxygen availability. Dense, moisture-retentive conventional potting mixes are fundamentally unsuitable and will cause rapid root rot.
The ideal medium consists of 40–50% chunky orchid bark (medium to coarse grade), 20–30% perlite or pumice, 10–15% coco coir or peat-free potting mix for moisture buffering, and 10% worm castings for gentle slow-release nutrition. Some growers add 10% sphagnum moss or coco husk chips for additional moisture retention in drier climates. The overall mix should feel open and chunky — almost more like an orchid medium than a standard potting mix.
Optimal soil pH is between 5.5 and 6.5 (mildly to moderately acidic). This range mirrors the naturally acidic organic substrate of the plant’s native limestone rock-crevice habitat and supports effective uptake of iron, manganese, and other micronutrients. Alkaline conditions above pH 7.0 cause nutrient lock-out and chlorosis.
Drainage must be outstanding — water should pass through the chunky medium almost instantaneously, with no pooling or prolonged moisture retention. The medium should return to a moist-but-not-wet state within 24 hours of watering. Any medium that remains wet for longer is too dense for this species.
Horticultural charcoal at 5–10% by volume maintains a clean, aerobic root environment and inhibits anaerobic bacteria. Mycorrhizal inoculants introduced at potting time significantly enhance root health and nutrient uptake efficiency. Slow-release fertilizer granules blended into the mix provide a stable baseline nutrient supply for 3–6 months post-potting.
The most serious and most common problem for Anthurium clarinervium. Dense, waterlogged medium causes oxygen depletion in the root zone, creating anaerobic conditions that promote Pythium and Phytophthora root rot. Symptoms include yellowing leaves, soft basal stem tissue, and a foul medium odour. Immediate repotting into appropriate chunky medium is the only effective intervention.
Organic components of the mix — even bark-heavy mixes — break down over time, reducing pore space and drainage. Signs include water pooling in the medium and declining plant vigour despite adequate care. Repot into fresh medium every 1–2 years to prevent compaction-related decline.
Alkaline conditions (pH above 6.5–7.0) caused by hard tap water, lime-rich components, or alkaline fertilizers cause interveinal chlorosis — yellowing of leaf tissue between the silvery veins while the veins themselves remain green. Use rainwater or filtered water, ericaceous amendments, and pH-appropriate fertilizers.
Salt accumulation from synthetic fertilizers and tap water produces white deposits on the medium surface and pot edges and may cause root tip burn visible as brown root tips. Flush the medium thoroughly with clean water every 2–3 months and use fertilizer at half strength.
The most common deficiency in Anthurium clarinervium is iron or magnesium, resulting in interveinal chlorosis on new leaves. Ensure pH is within the 5.5–6.5 optimal range and supplement with monthly chelated iron and Epsom salts if chlorosis is present.
Anthurium clarinervium tolerates mild root binding but declines when severely constrained. Signs include very rapid medium drying, roots emerging from drainage holes, and progressively smaller new leaves. Repot when roots fill the container, typically every 1–2 years.
 Fertilizer
Anthurium clarinervium has moderate fertilizer needs during its active growing season and benefits from a regular programme of dilute, balanced fertilization to support the production of its characteristically large, richly veined leaves. The open, chunky epiphytic medium used for this species leaches nutrients more rapidly than conventional potting mixes, making regular fertilization during the growing season important for maintaining plant vigour and leaf quality.
A balanced, water-soluble fertilizer with an NPK ratio of 20-20-20 or a foliage-specific formula with slightly higher nitrogen (3-1-2 ratio), diluted to one-quarter to one-half of the label-recommended strength, applied every 2–4 weeks during spring and summer. Some experienced growers prefer a low-nitrogen, high-phosphorus and potassium formula during late summer to encourage robust root development before winter.
Every 2–4 weeks from early spring through mid-summer. Once every 6–8 weeks in late summer through early autumn. Withhold all fertilization from late autumn through winter.
Always water the plant with plain water first before applying dilute fertilizer to prevent chemical burn on roots that may be exposed in the open epiphytic medium. Apply the dilute solution evenly across the medium surface. Do not apply fertilizer during periods of temperature stress, following repotting, or when the plant is showing signs of pest or disease stress.
Brown, scorched leaf tips and margins appearing shortly after fertilization; white salt deposits on the medium surface and pot edges; yellowing of leaves despite adequate watering; in the chunky medium of this species, root burn from salt accumulation may cause roots to turn brown and dry at the tips.
Progressive reduction in new leaf size compared to mature leaves on the same plant; paler, less richly coloured new growth; slower leaf production rate during the active growing season; in very depleted medium, minor vein contrast reduction on new leaves.
Worm castings lightly top-dressed onto the medium surface provide gentle, slow-release balanced nutrients with excellent microbial benefits and no burn risk. Diluted fish emulsion at quarter strength applied monthly provides nitrogen and micronutrients in a form compatible with the acidic medium. Liquid seaweed extract monthly supports micronutrient availability and root health.
Iron is particularly important for Anthurium clarinervium — monthly applications of chelated iron (Fe-EDTA or Fe-DTPA) support the richness of the deep green vein and background colouration against the silver veins. Magnesium supplementation via monthly Epsom salts (1 teaspoon per gallon of water) supports chlorophyll production and maintains the depth of the characteristic dark green velvety texture. Calcium is also important for cell wall integrity in the large leaves — ensure the fertilizer formula includes calcium or supplement separately.
 Watering
Anthurium clarinervium requires a nuanced watering approach that maintains moisture availability at the root zone without allowing the medium to become saturated or remain wet for extended periods. The fleshy, epiphytic roots need moisture but are highly sensitive to oxygen deprivation from waterlogging — the ‘soak and near-dry’ approach, allowing the medium to become almost but not completely dry before the next watering, is more appropriate than the ‘consistently moist’ approach used for many tropical foliage plants.
Every 7–10 days during spring and summer in typical indoor conditions. Every 10–14 days in autumn and winter as growth slows. However, the chunky, open medium dries at a significantly different rate depending on pot material, size, temperature, and humidity — always assess medium moisture by pushing a finger 1–2 inches into the medium before watering rather than following a calendar.
Water thoroughly by slowly applying water to the medium surface until it flows freely from all drainage holes, ensuring complete medium saturation. Allow to drain fully — at least 15–20 minutes — before returning to its saucer or outer pot. Empty saucers within 30 minutes to prevent any standing water accumulation.
Anthurium clarinervium is among the more sensitive aroids to water quality. The velvety leaf surface can develop brown spots or tip burn in response to fluoride and chlorine in municipal tap water, and hard, mineral-rich water gradually alkalinises the acidic medium over time. Rainwater is strongly preferred and consistently produces the best results. Filtered water or tap water left overnight to off-gas chlorine is acceptable. Distilled water can be used but should be supplemented with dilute fertilizer as it lacks essential minerals.
Slight drooping or wilting of petioles and leaves; the velvety leaf surface appearing slightly less turgid and plump; dry, completely desiccated medium throughout the pot depth; new leaves failing to fully expand; older leaves developing crispy brown edges.
Yellowing of leaves — particularly lower leaves; soft, discoloured, potentially mushy stem tissue at the base; foul odour from the medium; fungus gnats around the medium surface; dark, mushy, malodorous root tips visible on inspection; medium remaining wet for more than 48–72 hours after watering.
During winter, reduce watering significantly as growth rate decreases and evaporation from the medium slows. In warm summer conditions with high light and active growth, monitor medium moisture more frequently as the combination of faster evaporation and active root uptake may necessitate more frequent watering. Never water a plant that is already in a warm, stuffy room on a hot day as root zone temperature elevation combined with moisture increases root rot risk.
Stop guessing. Most houseplant failures are caused by volumetric errors and improper moisture tension. Our deterministic calculator moves beyond "once-a-week" watering by analyzing the four critical pillars of root health:
Personalized for this plant
Disclaimer: Our calculator is pretty smart. We’ve crunched the numbers, but we’re not measuring the quantum state of your living room. Since we don’t know your exact indoor temperature, humidity, light, airflow, or whether your plant receives daily sweet nothings and motivational speeches, use this calculator as a guide—and always keep an eye on your plant.
 Lighting
Anthurium clarinervium thrives in bright to medium indirect light — ideally 300–800 foot-candles for 10–12 hours daily. It performs best in a position near an east-facing window with gentle morning light, or a few feet back from a bright south- or west-facing window where direct sun is blocked by a sheer curtain or diffused by distance. The velvety leaf surface, rich vein contrast, and leaf size are all maximised under bright indirect light conditions.
Light intensity has a direct and measurable effect on the quality and appearance of new leaves in Anthurium clarinervium. Plants grown in brighter indirect light (500–800 foot-candles) typically produce larger leaves with richer, deeper green velvety texture and more brilliant, high-contrast silver vein patterning. Plants in lower light produce smaller, less vividly veined leaves with a less pronounced velvety quality.
Progressively smaller new leaves; paler, less deep green velvety texture; less brilliant and lower-contrast vein patterning; etiolated petioles that stretch toward the light source; very slow leaf production rate.
Pale, bleached, or yellowed leaf surfaces; the velvet texture appearing dull or washed out rather than richly deep green; crispy brown patches on the leaf surface, particularly on the most exposed faces; the characteristic deep green colour fading to lime green or yellow in intense direct light.
If natural bright indirect light is unavailable, supplement with a full-spectrum LED grow light providing 300–800 foot-candles for 12–14 hours daily, positioned 18–24 inches above the plant. The velvet leaf surface of Anthurium clarinervium absorbs light particularly efficiently, meaning it can achieve excellent photosynthesis at lower light intensities than many glossy-leaved aroids.
 Temperature
Anthurium clarinervium thrives at temperatures between 65°F and 80°F (18°C–27°C). This range reflects the warm but not extreme temperatures of its Chiapas highland habitat, where elevations of 1,000–2,500 metres produce conditions that are considerably cooler than lowland tropical environments — particularly at night. This species appreciates and benefits from a temperature drop of 5–10°F (3–6°C) at night, which more closely mimics its natural diurnal temperature cycle.
Cold sensitivity is significant. Temperatures below 55°F (13°C) for extended periods cause leaf discolouration, petiole softening, and root activity cessation. Temperatures below 50°F (10°C) cause irreversible cold damage manifesting as dark, water-soaked patches on leaves and potential root death. Frost is fatal. Cold drafts from open windows, single-pane glass, or air conditioning vents are common causes of localised cold damage in indoor specimens.
While the plant handles temperatures up to 85°F (29°C) well when humidity is adequate, temperatures consistently above 85°F (29°C) combined with low humidity and reduced air circulation increase stress and may cause accelerated transpiration that the root system cannot match, resulting in wilting and leaf damage. Ensure adequate humidity and air circulation during heat events.
Unlike many tropical plants, Anthurium clarinervium genuinely benefits from cooler nighttime temperatures of 60–65°F (15–18°C), reflecting the temperature drop that occurs at elevation in its native habitat. This diurnal temperature differential supports robust plant metabolism and may enhance the quality of new leaf development.
Keep away from cold exterior windows during winter. Insulate windowsill plants from cold glass. Avoid air conditioning vents blowing cold air directly onto the plant. Position in a consistently warm room where temperatures remain stable above 65°F (18°C) throughout the day and do not drop below 55°F (13°C) at night.
 Humidity
Anthurium clarinervium requires consistently high humidity of 60–80% for optimal growth, leaf quality, and the prevention of the brown marginal damage that is the most common aesthetic complaint with this species indoors. Its native Chiapas cloud forest habitat maintains humidity of 75–90% throughout the year, and the gap between this and typical indoor humidity levels of 30–50% is the primary reason so many growers find the plant disappointing in standard household conditions.
Brown, crispy leaf margins and tips on both mature and new emerging leaves — the most consistent and reliable indicator of humidity stress; new leaves emerging with brown, desiccated margins even before they fully unfurl; the velvety leaf surface appearing dull and stressed rather than richly deep green and turgid; significantly slower leaf production rate.
Humidity above 85–90% in enclosed environments with poor air circulation promotes fungal diseases including Botrytis and bacterial soft rots on the velvet leaf surface. Water droplets sitting on the velvet surface in still, humid air create localised conditions for fungal infection. Ensure gentle air circulation even within high-humidity environments.
The most effective and reliable solution for indoor cultivation of Anthurium clarinervium. A cool-mist ultrasonic humidifier maintaining 65–75% relative humidity produces the most dramatic improvement in leaf quality, size, and the prevention of marginal browning. Essential equipment for growers in dry climates or those experiencing persistent brown leaf margins despite correct watering. Position 2–5 feet from the plant and run throughout the day.
Growing Anthurium clarinervium in a large, open-topped or semi-enclosed terrarium or dedicated plant cabinet naturally maintains humidity at 70–85% through soil evaporation and plant transpiration without any additional equipment. The most elegant and self-sustaining solution for sustained high humidity, and the growing environment closest to the plant’s natural cloud forest habitat.
A wide tray of pebbles and water placed beneath the pot provides a modest localised humidity boost (5–10% above ambient) as the water evaporates from the pebble surface. Useful as a supplementary measure in conjunction with other methods but insufficient alone in very dry environments.
Direct misting of Anthurium clarinervium requires particular care — while light misting provides a temporary humidity boost, water droplets sitting on the velvet leaf surface in low-airflow conditions can cause water spots and fungal damage. If misting is used, do so in the morning to allow foliage to dry before cooler evening temperatures and ensure good air circulation around the plant after misting.
Grouping Anthurium clarinervium with other moisture-loving aroids, ferns, and tropical plants creates a shared, passively elevated humidity microclimate through collective transpiration. Effective as a supplementary measure and aesthetically complementary.
If growing in an enclosed environment where humidity consistently exceeds 85–90%, increase ventilation by partially opening lids or doors, use a small fan for gentle air circulation, and ensure the medium is not too moisture-retentive. Balance high humidity with adequate airflow to prevent fungal disease.
 Propagation
Anthurium clarinervium can be propagated by stem and offset division, stem cuttings, and seed (from pollinated inflorescences). Division of offsets is the most reliable method for home growers and produces established plants most rapidly. Stem cuttings are possible but more challenging than for many aroids. Seed propagation is slow and requires prior pollination, but produces the most genetically variable offspring. The best time to propagate is late spring through summer when warm temperatures maximise rooting speed and recovery.
Success Rate: Very High (85–95%) — the most recommended method
Description: Mature Anthurium clarinervium plants periodically produce offsets (basal shoots or side growths) from the base of the stem. These can be carefully separated when they have developed their own visible root system.
Steps:
Success Rate: Moderate (60–75%) — more challenging but viable
Description: Sections of the main stem with at least one or two nodes and aerial roots can be removed and rooted. This is more applicable as the plant ages and develops a longer, more multi-noded stem.
Steps:
Success Rate: Low to Moderate for home growers; requires prior successful pollination
Description: Seeds can be extracted from ripened Anthurium clarinervium berries following successful hand-pollination of the inflorescences. Seeds must be planted fresh as they lose viability rapidly upon drying.
Steps:
Late spring through mid-summer (May–July) when warm temperatures maximise rooting speed, recovery vigour, and new growth establishment.
Offset divisions: 4–8 weeks for root establishment, full independent growth within 2–3 months. Stem cuttings: 4–8 weeks for rooting. Seeds: 6–18 months from germination to a plant of ornamental size.
 Potting
Terracotta pots are excellent for Anthurium clarinervium because their porous walls wick moisture away from the root zone, significantly reducing root rot risk in a species that is highly sensitive to waterlogging. Terracotta also stabilises the medium temperature and provides excellent airflow to the root zone through the pot walls. Clear or translucent plastic nursery pots are favoured by experienced aroid growers because they allow visual inspection of the root system without removing the plant from the pot — a significant advantage for monitoring root health in this species. Avoid glazed ceramic or non-porous plastic that retains moisture.
Multiple drainage holes are strongly recommended. A layer of chunky perlite, pumice, or broken terracotta at the base of the pot provides additional drainage insurance. Never allow the pot to sit in a water-filled saucer.
Choose a pot only 1–2 inches larger than the current root ball diameter. Anthurium clarinervium is susceptible to root rot in oversized pots where excess medium volume retains moisture relative to root uptake capacity. Slightly snug pot sizing actually reduces root rot risk in this species.
Every 1–2 years in spring or when the plant shows signs of being root-bound. The chunky epiphytic medium also breaks down and compacts over time, necessitating medium replacement even if the pot size does not need to increase.
Roots growing densely through all drainage holes; very rapid medium drying after watering (indicating roots have displaced most of the medium); the medium has visibly broken down from chunky and open to dense and compacted; progressively smaller new leaves despite good care; visible root crowding on removal from the pot.
Early spring is ideal. Water the plant 24 hours before repotting. Wearing gloves, gently remove from its current pot. Loosen and remove as much of the old medium from the roots as possible without damaging them. Inspect all roots and trim any dead (black, mushy, malodorous) or excessively circling roots with sterile scissors. Repot into fresh chunky epiphytic medium in an appropriately sized pot, positioning the plant at the same depth as previously. Water gently and maintain high humidity for 2 weeks during recovery.
Root pruning is not routinely required but may be performed on severely root-bound specimens where continuing to increase pot size is impractical. Trim no more than 20–25% of the root mass with sterile scissors. Allow the plant to recover in a shaded, humid location for 2–3 weeks before returning to standard care. Never root-prune during periods of heat stress or low light.
After repotting, maintain high humidity (above 65–70%), consistent warmth above 65°F (18°C), and bright indirect light for 2–3 weeks. Water conservatively — just enough to maintain moist (not wet) medium — for the first 2 weeks to allow any root disturbance to callous. The first new leaf produced after repotting confirms successful establishment.
 Pruning
Anthurium clarinervium does not require routine structural pruning for health or form maintenance — its compact, upright, rosette-like growth habit and relatively slow leaf production mean it develops a naturally attractive form without intervention. Pruning is performed primarily to remove aged, yellowing, or damaged leaves; to remove inflorescences when flower production is not desired; to manage the spent cataphylls (papery sheaths) that accumulate at the base of petioles as leaves mature; and occasionally to collect propagation material from older, multi-noded stem sections.
Remove individual damaged or yellowing leaves at any time of year as they are identified — there is no seasonal restriction for leaf removal. Inflorescence removal can be performed as soon as the spathe is identified and the decision made not to pursue flowering or seed production. Spent cataphyll removal and any structural or propagation-related pruning is best performed in early spring.
Remove individual damaged, yellowing, or pest-affected leaves as they are identified throughout the year. Remove spent cataphylls once or twice per year as they accumulate at the stem base. Remove inflorescences promptly as desired to redirect the plant’s energy toward leaf production. No routine structural pruning is required.
Removal of yellowing or aged leaves to maintain the plant’s ornamental appearance and reduce potential disease harbouring sites; removal of inflorescences to redirect energy toward foliage production; removal of spent cataphylls for aesthetic tidiness; collection of stem cuttings for propagation; removal of any brown-tipped leaf sections that detract from the ornamental display.
Clean, sharp scissors or bypass pruning shears sterilized with 70% isopropyl alcohol before each use. Disposable gloves to protect skin from the calcium oxalate-containing sap. A clean, damp cloth for wiping tools between cuts when working on multiple leaves.
After pruning, maintain the plant in its standard optimal care conditions — high humidity, bright indirect light, and appropriate watering. For plants where significant leaf removal has been performed, withhold fertilization for 2–4 weeks to allow the plant to stabilise before recommencing its nutrition programme. Monitor the plant over the following weeks for new growth emerging from the central growing point, confirming continued vigorous health.
The velvety leaf surface of Anthurium clarinervium is uniquely susceptible to permanent marking from physical contact. Any rubbing, pressing, or sustained contact with the velvet surface leaves visible, permanent impressions that do not recover as the papillate surface cells are physically flattened. Always handle the plant’s leaves with extreme gentleness during all care activities, particularly pruning — support leaves by their petioles rather than the leaf blade when repositioning during pruning. The calcium oxalate sap in the petioles and stems is an active skin and eye irritant — maintain rigorous hygiene throughout and particularly after all pruning activities.
 Blooming
Anthurium clarinervium produces inflorescences of the typical Araceae spathe-and-spadix type, though as with most foliage-type anthuriums, the floral display is modest and not the primary ornamental feature of the species. The inflorescences consist of a pale green, often slightly yellowish or cream spathe (a modified leaf bract) and a narrow, elongated, pale greenish spadix (the true flowering structure) bearing tiny individual flowers. Mature indoor specimens typically produce inflorescences at intervals throughout the warmer months of the year — spring and summer are the most common blooming periods, though plants in consistently optimal conditions may produce flowers at other times as well.
The flowers of Anthurium clarinervium are not ornamentally significant compared to the extraordinary foliage, and many growers choose to remove inflorescences promptly to redirect the plant’s energy toward leaf production. If the flowers are pollinated — either by insects in outdoor cultivation or artificially by growers using a fine brush to transfer pollen — the plant produces small, rounded berries (infructescences) that turn orange or red as they ripen over several months and contain one or more seeds. Seed production can significantly deplete the plant’s energy, and unless seed propagation is the goal, it is generally advisable to remove inflorescences before fruiting. Blooming in optimal conditions requires temperatures above 65°F (18°C), bright indirect light, consistent fertilization during the growing season, and the same high humidity and open medium that support the finest leaf production.
 Pests and Diseases
Name: Spider Mites (Tetranychus urticae)
Symptoms: The velvet leaf surface makes spider mite detection more challenging than on glossy-leaved plants. Signs include subtle stippling and dulling of the normally rich, deep velvety texture; fine webbing visible in the growing point and between young petioles; tiny moving specks on the underside of leaves under magnification; the velvet surface appearing dull, bronze, or grey-washed rather than deeply green and vibrant. Most common in hot, dry conditions with low humidity.
Treatment: Increase ambient humidity immediately as the primary environmental control measure. Gently wipe both leaf surfaces with a very soft, damp cloth to physically remove mites — take extreme care on the velvet surface, using the lightest possible pressure to avoid damaging the papillate cells. Apply a dilute neem oil solution or insecticidal soap carefully to stem and petiole surfaces. Apply a systemic miticide soil drench (imidacloprid or abamectin) for severe infestations — this avoids the need to repeatedly contact the delicate velvet leaf surface with spray. Maintain humidity above 60% as an ongoing preventive measure.
Name: Mealybugs (Pseudococcus spp.)
Symptoms: White, cottony, waxy clusters at the base of petioles, in the growing point, between developing cataphylls, and in any sheltered crevice on the plant; sticky honeydew deposits; sooty black mould on honeydew; distorted or stunted new growth. Mealybugs favour the sheltered spaces around the growing point and cataphyll bases of Anthurium clarinervium.
Treatment: Isolate the plant immediately. Use a fine-tipped cotton swab or soft brush dipped in 70% isopropyl alcohol to carefully remove all visible mealybug clusters from their hiding places, including deeply within the growing point and beneath cataphylls. Apply a systemic insecticide soil drench — particularly effective as it kills mealybugs via the plant’s vascular system without requiring contact spray on the velvet leaf surfaces. Repeat alcohol treatment every 7 days for 3—4 cycles while monitoring for new clusters.
Name: Scale Insects (Coccidae / Diaspididae)
Symptoms: Small, flat, brownish or greyish shell-like bumps on petioles and the underside of leaf midribs; honeydew deposits; progressive yellowing and weakening of the plant.
Treatment: Physical removal with a soft toothbrush or cotton swab dipped in isopropyl alcohol, targeting petioles and leaf undersides. Apply neem oil or horticultural oil to smother juvenile crawlers. Systemic insecticide soil drench for widespread infestations.
Name: Fungus Gnats (Bradysia spp.)
Symptoms: Small dark flies around the medium surface; larvae in the upper medium layer; fine root hair damage; slowed growth. More common when the chunky medium has been overwatered.
Treatment: Allow the medium surface to dry more between waterings. Apply Bacillus thuringiensis var. israelensis (Bti) soil drench. Use yellow sticky traps for adults. Apply horticultural sand or grit as a top layer over the medium surface to deter adult egg-laying.
Name: Thrips (Thysanoptera)
Symptoms: Distinctive silvery-grey streaking or scarring across the velvet leaf surface from cell feeding damage — particularly visible and disfiguring on this species due to the high-contrast, deep velvety background; distorted or cupped new growth; black faecal specks on leaf surfaces.
Treatment: Remove and dispose of the most heavily damaged leaves. Apply a systemic insecticide soil drench to avoid direct spray contact with the velvet leaf surface. Spinosad spray applied carefully to leaf undersides and the growing point — avoiding direct velvet surface contact — is also effective. Repeat every 5 days for at least 3—4 treatment cycles.
Name: Root Rot (Pythium spp., Phytophthora spp.)
Symptoms: Yellowing, wilting, or drooping leaves despite moist medium; soft, darkened, mushy stem tissue at the base; foul odour from the medium; the fleshy roots appearing dark, mushy, and malodorous rather than firm and white or cream; plant instability.
Treatment: Remove the plant from its pot immediately and perform a thorough root inspection. Trim all diseased (brown-black, mushy, malodorous) roots and stem tissue with sterile scissors until only firm, cream-white healthy tissue remains. Dust all cut surfaces with powdered cinnamon or sulphur. Allow the root ball to air-dry for 1–2 hours. Repot into completely fresh, dry, chunky epiphytic medium. Withhold watering for 3—5 days to allow cuts to callous. Drastically reduce watering frequency going forward. Prevention through correct chunky medium and conservative watering is far more effective than treatment.
Name: Bacterial Leaf Spot (Xanthomonas spp.)
Symptoms: Water-soaked, dark brown to black irregular lesions on the velvet leaf surface, often surrounded by a yellow halo. On the velvety texture of Anthurium clarinervium, these lesions have a particularly disfiguring appearance against the dark green and white vein patterning. Lesions may enlarge and coalesce under humid, poorly ventilated conditions.
Treatment: Remove all affected leaves immediately in sealed bags. Avoid all overhead watering, misting directly onto leaves, and leaf wetness in still air. Improve air circulation within the high-humidity growing environment. Apply copper-based bactericide as curative and preventive treatment. Ensure adequate ventilation.
Name: Botrytis / Grey Mould (Botrytis cinerea)
Symptoms: Soft, grey-brown water-soaked patches on the velvet leaf surface, cataphylls, and growing point; visible grey-white fuzzy mould growth in humid, still-air conditions; premature cataphyll rot and growing-point collapse in severe cases. More likely in enclosed growing environments where humidity is very high but air circulation is poor.
Treatment: Remove all affected tissue immediately. Significantly improve air circulation in the growing environment. Reduce humidity slightly if above 85%. Apply chlorothalonil or copper-based fungicide. Introduce gentle air movement (fan) in enclosed growing environments even while maintaining high humidity.
Name: Velvet Leaf Marking (Physical/Environmental)
Symptoms: Permanent impressions, flattened patches, water spots, or fingerprint marks on the velvety leaf surface. Not infectious but permanently reduces the ornamental appearance of affected leaves. Caused by physical contact with the velvet surface, water droplets sitting on the surface, or excess fertilizer or mineral deposits landing on the leaf.
Treatment: There is no treatment — physically damaged velvet surface cells do not recover. Affected leaves will retain their marks permanently. Prevention through careful handling — supporting leaves by their petioles rather than leaf blades, avoiding any liquid contact with the velvet surface, and protecting from physical disturbance — is the only effective management strategy. The only resolution is to wait for the affected leaf to naturally senesce and be replaced by new, unblemished foliage.
 Special Features
Anthurium clarinervium is widely considered one of the most exquisitely beautiful foliage plants available in cultivation, possessing a combination of features — the extraordinary velvety leaf texture, the dramatic high-contrast silver vein network against the deep forest-green background, and the generous, broadly cordate leaf form — that creates an aesthetic effect more reminiscent of an illuminated botanical illustration or a piece of woven textile art than a living plant. The velvet texture itself is the result of a dense covering of papillate epidermal cells that trap and scatter light in a manner that produces the characteristic matte, light-absorbing depth of fine velvet fabric, and that gives the leaves a subtle iridescence that shifts as the angle of viewing changes. This iridescence is particularly pronounced on new, fresh leaves and is one of the most captivating visual qualities of the species. The white-to-silver vein network, produced by the contrast between the photosynthetically rich, chloroplast-dense green cells of the mesophyll and the relatively chloroplast-sparse, lignified cells of the vascular bundles, creates a natural lacework of extraordinary intricacy that inspired the plant’s evocative common name. Each new leaf that emerges from the pale cataphyll sheath is a unique work of natural artistry, with the vein pattern of each leaf differing subtly from all others in both the precise branching arrangement and the intensity of the silver-to-white contrast. The plant’s moderate documented capacity for absorbing airborne formaldehyde and ammonia from indoor air, combined with its non-cloying, subtle presence and the profound aesthetic satisfaction of tending and observing it, make it one of the most psychologically rewarding of all premium indoor plants.
 Plant Benefits
Anthurium clarinervium is not an edible or recognised medicinal plant and must not be consumed due to its calcium oxalate toxicity. The Anthurium genus broadly has attracted scientific investigation due to the presence of various bioactive compounds in different species, including alkaloids, flavonoids, and lectins, with some in vitro studies showing antimicrobial and cytotoxic activity. However, none of these findings have been translated into approved medical applications, and no home medicinal use of Anthurium clarinervium is appropriate or safe. The plant’s primary benefits are aesthetic, psychological, and environmental. As a premium foliage plant with documented moderate VOC-absorbing capacity — particularly formaldehyde and ammonia — it contributes to improved indoor air quality. In environmental psychology research, the presence of distinctive, visually complex foliage plants has been consistently associated with reduced perceived stress, improved mood, enhanced concentration, and increased overall wellbeing. The extraordinary visual complexity and tactile appeal of Anthurium clarinervium’s foliage make it particularly effective in this role, offering an ongoing visual and contemplative engagement that simpler, less visually detailed plants cannot match. In biophilic interior design, it is specifically valued for its ability to introduce an intense, focused natural detail — the intricate vein network visible at close range — that rewards extended visual attention in a way uniquely beneficial to the experience of nature connection in indoor environments.
 Additional Information
Anthurium clarinervium was first described botanically by the American botanist Enid Matilda Ekman in 1935 and is classified within the section Cardiolonchium of the genus Anthurium — a large grouping of predominantly velvet-leaved, large-foliage aroids native to tropical Mesoamerica. The species is endemic to a relatively small geographic range in the Chiapas highlands of southern Mexico, where habitat loss due to agricultural expansion and deforestation has reduced its natural populations significantly. It is considered a threatened species in its native range. In cultivation, Anthurium clarinervium has been hybridised with several related species to produce offspring with combined characteristics — notable hybrids include crosses with Anthurium crystallinum (the Crystal Anthurium, which has similar velvety, silver-veined foliage but originates from lowland Panamanian and Colombian rainforest), Anthurium magnificum, and Anthurium regale. These hybrids are popular among aroid collectors for their variability and often extreme leaf size. The common name ‘Laceleaf’ refers specifically to the intricate white vein patterning. The species should not be confused with other aroids sold under the common name ‘lace anthurium’ in some markets. Anthurium clarinervium has received the Royal Horticultural Society’s Award of Garden Merit recognition in recognition of its outstanding ornamental qualities.
 Life Cycle
Anthurium clarinervium is a perennial epiphytic tropical herb that experiences no true seasonal dormancy in its native Chiapas highland habitat, where conditions remain relatively stable throughout the year despite distinct wet and dry seasons. In cultivation, the plant undergoes a relative reduction in growth rate during autumn and winter in response to lower light and cooler temperatures, but does not die back or enter dormancy. Active, vigorous growth resumes in spring as light intensity and temperature increase. New leaves emerge sequentially from the central growing point, each initially enclosed within a pale papery cataphyll that peels back as the new leaf unfurls over a period of 1–3 weeks. The growth rate is relatively slow compared to many tropical aroids — in typical indoor conditions, a new leaf may be produced every 4–8 weeks during the active growing season. As the plant matures and the stem elongates, lower petioles naturally senesce and fall away, and the spent cataphylls remain as a fibrous covering on the lower stem. In optimal conditions with a moist moss pole for climbing support, the stem extends vertically and produces progressively larger leaves. Inflorescences are produced at intervals during warm periods. Anthurium clarinervium is an essentially indefinite-lived perennial under good indoor cultivation, with well-maintained specimens persisting and developing for a decade or more.
 Are Laceleaf Anthurium Poisonous, Toxic
Anthurium clarinervium is toxic to humans, cats, dogs, and other domestic animals. In common with all members of the Araceae family, it contains insoluble calcium oxalate crystals (raphides) throughout all plant tissues. These microscopic, needle-sharp crystals are ejected forcefully from specialised cells called idioblasts when the plant tissue is chewed or crushed, penetrating the soft mucous membranes of the mouth, throat, and gastrointestinal tract and causing immediate, intense mechanical and chemical irritation.
All parts of the plant are toxic, including the leaves, stems, petioles, roots, and sap. The leaves and their petioles contain the highest concentrations of calcium oxalate raphides.
Immediate and intense burning, stinging, and swelling of the mouth, lips, tongue, and throat; excessive drooling or salivation; pawing at the mouth in animals; difficulty swallowing.
Nausea, vomiting, difficulty swallowing (dysphagia), swelling of oral and pharyngeal tissues, gastrointestinal distress, loss of appetite, and lethargy. In severe cases, significant oropharyngeal swelling may impair breathing.
The sap from cut or bruised leaves and petioles causes contact dermatitis in sensitive individuals — localised redness, itching, and irritation. The velvety leaf surface may also cause mild mechanical skin irritation in very sensitive individuals.
Sap contact with the eyes causes immediate, intense pain, redness, tearing, and irritation. Flush immediately and seek medical attention.
Moderate. Fatalities are extremely rare but significant oral pain and gastrointestinal distress are common following ingestion. Veterinary or medical attention should always be sought promptly following any significant exposure.
Remove any plant material from the animal’s mouth immediately. Rinse the mouth and oral cavity thoroughly with clean water. Offer fresh water or a small amount of milk to dilute the crystals. Contact a veterinarian or the ASPCA Animal Poison Control Center (1-888-426-4435) immediately.
Rinse the mouth thoroughly with clean water. Do not induce vomiting. Contact Poison Control (1-800-222-1222 in the US) or seek emergency medical care if symptoms are severe or persistent.
Wash affected areas with soap and water for at least 15 minutes.
Flush the eye immediately and continuously with clean, lukewarm water for 15–20 minutes. Seek emergency medical attention promptly.
Position the plant in locations completely inaccessible to children and pets — elevated shelves, plant hangers, or dedicated plant rooms. Wash hands thoroughly after handling or pruning. Wear gloves when handling the plant frequently, particularly if skin sensitivity is noted. Never allow sap to contact eyes during any plant care activities.
 Frequently Asked Questions
Water Anthurium clarinervium when the chunky epiphytic medium has become almost but not completely dry throughout — approximately every 7–10 days in spring and summer, and every 10–14 days in autumn and winter. Always push a finger 1–2 inches into the medium to assess moisture before watering rather than following a calendar. Water thoroughly until water drains freely from all drainage holes, then empty the saucer. Never allow the medium to remain wet for more than 24–48 hours. Use rainwater or filtered water to avoid fluoride damage and medium alkalinisation.
Yes, Anthurium clarinervium is toxic to cats and dogs. All parts of the plant contain insoluble calcium oxalate crystals that cause intense burning and irritation of the mouth and throat, excessive drooling, vomiting, difficulty swallowing, and gastrointestinal distress if ingested. Keep the plant completely out of reach of pets and children. Contact a veterinarian or the ASPCA Animal Poison Control Center (1-888-426-4435) immediately if any ingestion is suspected. Wash hands after handling.
Brown leaf edges in Anthurium clarinervium are almost always caused by insufficient humidity — the most common care problem for this species indoors. The plant requires ambient humidity of 60–80% and suffers rapidly in typical household humidity of 30–50%, particularly during winter heating season. Increase humidity using a cool-mist humidifier, terrarium placement, or pebble tray. Also check that you are using rainwater or filtered water rather than fluoride-containing tap water, and that the medium is not drying out completely between waterings.
Anthurium clarinervium requires a very open, chunky, fast-draining epiphytic medium — not standard potting soil. An ideal mix is 40–50% chunky orchid bark, 20–30% perlite, 10–15% coco coir, and 10% worm castings. This creates an airy, bark-heavy medium similar to an orchid mix that provides both moisture access and excellent root zone aeration. Standard potting mix is far too dense and moisture-retentive, causing rapid root rot. The optimal pH is 5.5–6.5 (mildly acidic).
Anthurium clarinervium requires consistently high humidity of 60–80% for optimal growth and prevention of brown leaf margins. Its native Chiapas cloud forest habitat maintains 75–90% humidity year-round. Increase humidity using a cool-mist humidifier (most effective), terrarium or enclosed cabinet placement, pebble trays with water, or grouping with other moisture-loving plants. Monitor with a hygrometer and supplement promptly when humidity drops below 60%. Avoid misting directly onto the velvet leaf surface, which can cause water spots and fungal issues.
The most reliable method is offset division in late spring to mid-summer. When the plant produces a basal offset with 2–3 leaves and its own visible roots, gently remove the plant from its pot, separate the offset from the parent with a clean, sterile knife, allow cut surfaces to air-dry briefly, and pot the offset into fresh epiphytic medium in a small pot. Maintain high humidity (above 65–70%) and bright indirect light during establishment. New leaf production within 4–8 weeks confirms successful establishment.
Slow or stalled growth in Anthurium clarinervium is typically caused by one or more of: insufficient light (increase to 300–800 foot-candles of bright indirect light), low humidity (below 60%), incorrect medium (too dense, causing root rot or oxygen deprivation), infrequent fertilization during the growing season, temperatures below 65°F (18°C), or the plant being in its natural slower autumn/winter growth period. Check all environmental parameters and root health before assuming the plant is diseased.
Anthurium clarinervium thrives in bright to medium indirect light of 300–800 foot-candles for 10–12 hours daily. Position near an east-facing window with gentle morning light, or a few feet back from a bright south- or west-facing window with a sheer curtain. Brighter indirect light produces larger leaves with richer, deeper velvety texture and more vivid vein contrast. Direct sun at any intensity will bleach, yellow, or scorch the velvet leaf surface. Supplement with a full-spectrum LED grow light if natural bright indirect light is unavailable.
Touching the velvety leaf surface of Anthurium clarinervium should be minimised. The velvet texture is produced by delicate papillate epidermal cells that are permanently flattened by physical pressure, leaving visible, irrecoverable impressions and fingerprint marks on the surface. Always handle the plant by its petioles (leaf stems) rather than the leaf blades. Avoid resting anything on the leaves, and be careful during all care activities to prevent accidental contact with the velvet surface. If cleaning is needed, use the very lightest possible touch with a barely damp, very soft cloth.
Anthurium clarinervium thrives at temperatures between 65°F and 80°F (18°C–27°C). It originates from Chiapas highland cloud forest at elevations of 1,000–2,500 metres, so it appreciates cooler nighttime temperatures of 60–65°F (15–18°C). It is cold-sensitive and should not be exposed to temperatures below 55°F (13°C). Keep away from cold drafts, exterior windows in winter, and air conditioning vents. Avoid temperatures consistently above 85°F (29°C), particularly in low-humidity conditions.
 Can I grow Laceleaf Anthurium in my indoor space
Difficulty: Intermediate
Size: Medium
Light: Medium
Water: Medium
Flowering: Yes
Pet Safe: No
Air Purifier: Medium
 Anthurium clarinervium botanical details
Common Name: Laceleaf Anthurium
Other Common Names: Velvet Cardboard Anthurium, White-Veined Anthurium, Clarinervium Anthurium, Crystal Anthurium
Botanical Name: Anthurium clarinervium
Native Area: Chiapas highlands, southern Mexico. Found growing lithophytically and epiphytically in rocky limestone outcroppings, cloud forest understorey, and oak forest ravines at elevations of approximately 1,000–2,500 metres above sea level.
Family Name: Araceae
Plant Type: Perennial epiphytic tropical herb
Genus: Anthurium
Kingdom: Plantae
 Photo Gallery
 My Laceleaf Anthurium Plant Care Recommendations
If you find the Houseplant Encyclopedia helpful and would like to support Healthy Houseplants, you can use the links below to shop for recommended plants, products, and plant-care supplies.
Some links are affiliate links, which means I may earn a small commission if you make a qualifying purchase through them, at no additional cost to you. Thank you for supporting Healthy Houseplants and helping me continue to provide free plant-care information!

Want even more personalized plant-care help? Check out my AI Julie Chatbot—trained on my 20 years of houseplant knowledge, not just information from the internet!  Try it now:Ask AI Julie
 Buy Laceleaf Anthurium Online
✅ “Bring Home This Beauty Today”
✅ “Get Your Own Laceleaf Anthurium Before It’s Gone”
✅ “Shop Trusted Sellers – Limited Availability”
✅ “Free Delivery”
As an Amazon Associate, I earn commission from qualifying purchases.
 Plant Puns and Jokes
Why did the Anthurium clarinervium refuse to be photographed? Because it said its veins were too complex to be captured in a single shot — you need at least an hour and the best natural lighting to do justice to this level of detail!
 Signup to our newsletter and download Laceleaf Anthurium care guide

